Oct 27, 2010

art scissors

I just want to show you my new scissors that used for the yellow envelope bag. I got at a ¥300 yen shop. Very cheap, but you can make different design cut with different blades. It is easy to attach and take out.


かわいい入れ物に入って。
With cut bag the scissors are ¥300 only! 
一つのはさみではを付け替えて、いろんな形に切れます。
With interchange-able blades, you can cut in many shapes. 

Oct 21, 2010

paper folding box with a lid (from used calender)

A container (box) that consists of 2 folding boxes, one is for the bottom container and another is for the lid. A lid size, 13.2 by 13.2 by 7 cm. Container 13 by 13 by 6 cm. It is about the size to put regular scissors and Japanese paperback.
I used an old calender page of December, 2009 which has a nice Christmas theme illustration, so I have kept it. I made for the lid, and I measured 1 cm smaller size (opened paper size) to make a bottom part with a red craft paper to match the theme of the December calender. And then I put left over of the calender that I used for the lid and put inside and outside of the container.
My own reflection of this is I might went too far, because I could not paste the calender scrap on the container well on the red craft paper I used, so I put another glue to paste tight, but I kind of messed up with it, so I added white gesso on the paper to hide it. I am not sure if it is aesthetically too much and it would have looked better without the gesso painting... My grandmother make this paper container everyday for her fingers exercise with ads paper, but I thought if I use nicer and ticker paper, I can make a piece of art (product). This is my first time, so I will make more simple ones and more arty ones.
10/8 p.s. The bottom of the box was little messy, so I added some collage of Christmas design paper at the bottom.


Oct 13, 2010

A picture bag, fixed!

Hi I fixed the yellow envelope. I hope you like it. I like the solution of putting some collage inside the envelope to hide the tip of the ribbon. I even use the part of the yellow envelope that already but on top. I also put another ribbon on the back side of the ribbon strips (handles), so it won't show the white tape of the both side tape. I think it became strong and cuter. How do you think?
The yellow paper is a part of the stuff that I got from a mail artist in Alaska. She is a member of IUOMA, and she was kindly looking for some people in the IUOMA site to send some scrap paper. I guess sending her scrap was kind of her own conceptual art project. I was looking some yellow paper to fit in the envelope all over and found it in her envelope that she sent a bunch of paper scrap from there. I will also use other paper to fix the folding box next.


#1 I am trying to show you that I pasted another ribbon on the back side of the original ribbon. It is not showing the white tape of the both sided tape, and it became stronger to hold.


#2, 3 I could have taken these pictures before pasting it though. I want to show you how I covered the tip of the ribbon with collage. I also put the zigzag strip on the paper that used to cut from the top of the envelope. I think it would have looked unfinished, or not formal if I did not cover. As I said in the main post, the scrap paper was sent from a mail artist from Alaska. It is fun to find that I can use any recycle stuff, for my handmade works, and I make use of the stuff that somebody sending to me from overseas. (that I don't know much about, which is (to me) make the work more mysterious and exciting!) 


#4 I did not take photo of what I pasted, so I just took photo of the left over of the scrap paper. I think it is like a schedule pad or something. 

Oct 6, 2010

Multi purpose hanging pocket

.... That what is came out. I follow the reference text, and put photos on both sides. As your suggestion I wanted to put the photos on both sides, so that people can see or use the same sides. I put the Japanese paper on the background of the photo and wrap around the side of the envelope, so that it got extra pockets on both side. You can pull the one sheet of triangle on top to inside of the bag to use one side, or leave both triangle up, or put both triangle flips inside so that it becomes as a container. I don't know if it is a good solution, (it might have other ways to finish) but I put the string in both holes of the triangle flips.
It is hard to show it to 2D photos, so I took videos.


note: all these photos are from one piece of envelope bag, just in case you don't know. Size is slightly bigger than yellow bag, I think this is more like out of 11 by 14 envelope, but cut in half to have a triangle flip.

Here is the You Tube videos for the multi purpose hanging pocket (I want to say describe in a shorter words. any idea?)
I got a comment from Flickr friend that with video it makes more sense with what it is like, so please check with the video.
http://www.youtube.com/watch?v=t8tVaZ711Ug

http://www.youtube.com/watch?v=NENSFhnzd-Y

Sorry, the second video one, I took with side way. Basic mistake. I took the video with my digital still camera, so I think I moved the camera like I took photographs.


Oct 1, 2010

A picture bag


This is a new envelope bag, that is made with bigger envelope that I did before. It is A4 size, about 8 by 11 inch", so you can put some magazine or documents. I thought envelope bag you can do different sizes, depending on the size of the envelope, so I wanted to try to make bigger bag from it too. Not only I put handles with strings, but also I folded both sides, so that it became 1.5 cm wider than flat width envelope.
I found a mistake from last 3 used paper bag I did before. (see module 3) I put the handle(s) front to back, but normally for handbag, they have handles side to side on the same side. So I changed the way for this one. If you download the last one and place side by side on the computer screen, you see the difference how I put handles. Yes, like you said, more I make the same things, more I am aware of the mistake, and also I can make more with clean style. So even though I feel like it is time consuming to make the same thing, I see it is important. Thank you. : )
I will also attach original photos that I used for the bag. I printed these photos on ink jet printer ok transparent film label that has glue on the back. It comes with the white paper before printing, and when I finish printing the image, I pealed the paper off, and put on the envelope that I am working. I like to take photos of buildings, and I like to make use of the design on the bag, so it looks 3D (because of the thickness of the bag) and I thought it became kind of elegant with the design that they have on the photos.
In the image #4, I wanted to show the address label that is white so it shows the real color on the photograph. I wanted to place the flag on the white area on the top, it shows more clearly. 


Sep 30, 2010

remake envelope 1.2


remake envelope 1.2, originally uploaded by Tomoe Nakamura.

I redo the remaking envelope that I did before with my teacher's advice, because back of the envelope did not look "finished."

back of the envelope from the previously posted.

remake envelope 1


remake envelope 1, originally uploaded by Tomoe Nakamura.

I redo the remaking envelope that I did before with my teacher's advice, because back of the envelope did not look "finished."

Sep 29, 2010

Mac Bag Envelope

Mac Bag Envelope, the envelope made with Macdonald paper bag and hamburger wrap.
12.5 cm hight by 16.8 cm width 
The Mac Donald bag is thin so I pasted the hamburger wrap (I kept after I eat, and cleaned with dish soap) on the back, and then cut out with the shape of the template and fold as an envelope.


Sep 24, 2010

recycled envelope/bag paper bag

古い袋や封筒をちょっとアレンジするだけでかわいい買物袋、ギフトバックの出来上がり.これはハマるのでおいおい大量に作りたい...


I made 3 recycle bags. It is really a first time to made a bag, so it took a while to get used to the idea/technique. But I like the idea of recycle bags, and I want to continue after the class is over in real job or whatever.
#1 A bag made out of an Academy envelope. stamping, folding, taping. A straw string for handle of the bag.
dimension: height 19 width 8 depth 2.3 cm

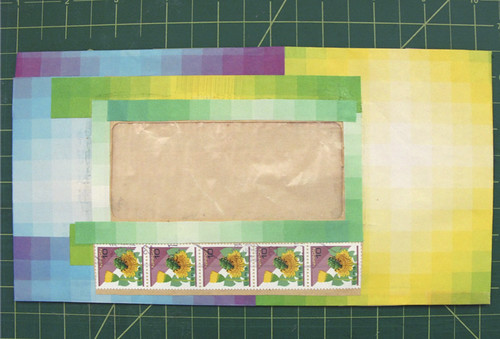
#2 A bag made with paper bag at a souvenir shop at Kohfukuji tempe museum. I just fold to make it wider and put a handle. (but it was too short) Some collage at front and back.
dimension: hight 15 width 10 depth 2 cm

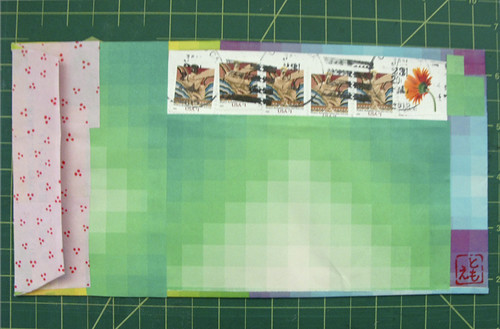
#3 A bag made out of official envelope from my town. For the security reason, back of the envelope has small design in blue. I wanted to use the design for the design of the bag, I opened up the envelope, flipped around to fold again the envelope inside out (what the inside of the envelope is now outside), and pasted again. Top flip, because it was fold back side when I fold as inside out, so it has unclean white, so I pasted Japanese paper as the shape of the flip. I did some stamping for extra design and put some origami paper. (left over from the last envelope I made)
dimension: hight 19.7 width 8.8 depth 3 cm


Joining newsletter!

FB art page

iTunes

rakuten